Vitu Maradadi (pretty things)
  • Polymer Clay Beads and Bling
  • About me
  • Cards
  • Parchment Cards

Europe and Other Destinations

7/3/2016

0 Comments

 
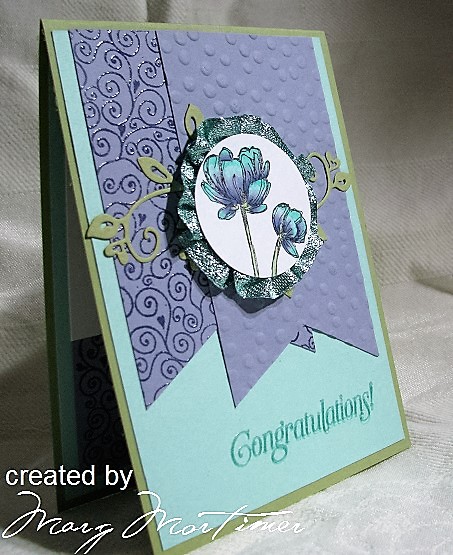
Hi everyone this  is a very short bog just to let you know that unless I have some brilliant IT revelation I wont be posting to my blog for the next three (3) months as we will be overseas and I will be working from our tablet which apparently wont let me edit my blog because it doesn't have the drop and drag facility I need.
​
I really can't afford to pay money for a professional site as I don't make money from my hobby and as far as I can see it still wouldn't allow for this, instead I will be uploading to Facebook photos on a regular basis for family and friends and then maybe when we return create a page for some of DH's better photos (most of them are brilliant, it is wonderful to have a creative partner, it makes life so much easier)
See you all in three months when I will be well and truly ready for more card making.
Cheers
Marg
0 Comments

SCS challenges TLC572, CAS366 & CC572

4/3/2016

2 Comments

 
Picture
Picture
The card above is for the Try a New Technique Challenge over at SCS link HERE - Paint Your Stamps. 

​The Clean and Simple Challenge over at SCS link HERE - Glittery Sentiments. 

The Color Combinations Challenge over at SCS link HERE - Real Red, Wild Wasabi, Marina Mist and Pacific Point or similar colors. Color swatch picture opposite. 

Picture
The background to the card image and also the inside of the card was created by doing a watercolor wash with SU Wild Wasabi on the bottom, Marina Mist in the middle and the darker Pacific Point at the top.
​I took a mop brush that held a fair amount of water and wet a piece of watercolor paper, I then brushed some of the green wash on then some of the light blue letting them run into each other and lastly the darker blue allowing them to run into the other colours.
I don't have good quality watercolor paper so have to be careful not to over wet the paper, just enough so that the paint will run and blend smoothly. 

Picture
Better quality paper will allow you to use more water however I achieved the same result just had to have a practical run first, which became the insert paper.

Once I had the backgrounds done I took my SU Stampin Write markers Real Red and Wild Wasabi and colored the stamp. I then activated the ink by misting the stamp with water and a Mini Mister (this gives a very fine mist) one squirt is enough.

I used a Copic Spica pen - red to highlight a few of the little dots around the flower heads and cut out the Hugs greeting from SU Glimmer paper first going over it with the Marina Mist marker.


Picture
The base of the card was cut to size and then the front was dry embossed with a cuttlebug Swiss Dots folder. 

Supplies and accessories used to make this card are;
Stamps: Stampendous - M217 Dandie Trio
Papers: X-Press It Blending Card, Watercolor paper, SU Glimmer Paper Silver.
Inks: SU ink refills Wild Wasabi, Marina Mist and Pacific Point.
Markers: SU Stampin Write - Real Red and Wild Wasabi. Copic Spica - Red.
Other accessories: Cuttlbug Embossing folder "Swiss Dots", Penny Black Creative Dies 51-025 Love Expressions, double sided tape (extra strong) SU Two Way glue, Ranger Mini Mister. 

​Thank you for stopping by, hope you have been inspired and enjoyed your read.

For further information or to see other cards I have made why not pop over to my gallery at Split Coast Stampers
margscardcrazy 
Cheers
​Marg

2 Comments

SCS challenges CC571 & SC581 #thedailymarker30day

3/3/2016

2 Comments

 
Picture
Picture


​This card is for the current colour challenge over at Split Cost Stampers. I love these colours and had quite a few ideas. I still might have time to do another card.

Picture


​The card is also for this weeks sketch challenge. I have stayed fairly close to form other than to use vine leaves for the center banner and to also add a greeting at the bottom.

This was a great sketch to work with and again had quite a few ideas and still might be able to do another one.

​As well as these two challenges I am also submitting it to the the daily marker 30 day colour challenge as the image in the center is coloured with copic markers. 

Picture

​I decided to create some interest with the two banners so heat embossed one with a background stamp from Amazing Creations that was given to me using Versa Mark watermark ink and clear embossing powder. 

With the other banner I dry embossed with the SU Decorative Dots embossing folder.

Picture


​Next I pieced the banners together using magic tape then mounted them onto a piece of Pool Party SU card.

Picture
I wasn't sure what to do with the banner across the centre and while I was looking for ribbon or some thing different I came up with the idea of using a die and leaves.

I really like this little swirly vine leaf die from Magnolia Doo Hicky Dies it has cute little hearts as leaves. I cut two and inverted them placing them across the centre as a banner.

I stamped the greeting first in Pool Party ink then over stamped with Versa Mark watermark and heat embossed clear embossing powder over the top. 

Picture
At this stage I mounted the front panel to the base card and then coloured the image using the feathering or flicking technique. This is a very effective technique if you want to blend two completely different colours and is achieved by starting at each end of an image and flicking towards the centre tapering your flicks as you go.

I took some of the new SU Pool Party glitter ribbon I got in my last order ran some small stitches around the edge of a length of the ribbon then gathered it to form a frame for my little image. I attached the ribbon to the back of the image with double sided  Wonder Tape which is super strong and mounted the whole thing with SU Dimensionals double thickness.

For the inside of the card I heat embossed with clear embossing powder the same background stamp and then butted up to hits strip with blending card attaching both with magic tape for stability. It was attached to some SU Pool Party card which in turn was attached to the inside base of the card.  

Picture
Supplies and accessories used to make this card are;
Stamps: SU "Bloom with Hope" & "Sky is the Limit" Amazing Creations "Swirls and Hearts."
Papers: X-Press It Blending Card, SU Wisteria Wonder, Pool Party & Pear Pizzazz
Inks: SU ink pad  Pool Party, Versa Mark Watermark. Memento Tuxedo Black
Copic Markers: BV11, BV13, BV17 BG32, BG34 & G43 for stems 0 colourless blender to highlighter.  
Other accessories: Clear embossing powder, SU Embossing folder "Decorative Dots", SU Stamp-a-ma-jig, 2" punch. Magnolia Doo Hicky die, SU Glitter ribbon "Pool Party", double sided tape (normal and extra strong) SU Dimensionals, SU fine tip glue pen. 

​Thank you for stopping by, hope you have been inspired and enjoyed your read.

For further information or to see other cards I have made why not pop over to my gallery at Split Coast Stampers
margscardcrazy 
Cheers
​Marg

2 Comments

Watercolour with SU Markers and Tim Holtz Distress Markers #thedailymarker30day

2/3/2016

0 Comments

 
Picture
Just a quick little post today talking about some quick and easy ways to be creative while you are traveling.
We have just spent a week away in our caravan visiting family before we head overseas.
I always get a little restless if I don't do something creative every week and so I stamped up some images onto some water colour paper and took my markers along for the ride.

This would have to be the quickest and easiest way to do water colour, all you need is markers that are water soluble like Tim Holtz Distress Markers, Stampin Up Stampin Write Markers or Tombow Markers and an aqua brush (these are brushes that hold water and have fine nylon bristle tips) or you can use a normal paint brush and water if you forget to bring your aqua brush lol.

I applied the colour direct to dry paper from the brush and as you can see in the right hand corner of the photo how I did this mainly was to scribble the marker onto the plastic pallet add some water to dilute the colour (it would be too strong taking the colour straight from the pallet to the paper) and then loading my brush.

I built the the colour up fairly quickly so that the previous layer of colour hadn't dried out as this can cause a bloom effect, nice if you want it but not so nice if you don't. This is for the same colour, once you are ready to move onto the next colour you need to make sure the previously coloured area is completely dry before you do this or you will end up with bleeding (another nice effect when you want it but not so attractive if you don't) Hence the reason for the three images, I moved from image to image while I waited for areas to dry.

To achieve the darker colours on the images I moistened my brush with clean water and touched the brush directly to the marker tip lifting off the colour which was much more intense and doesn't harm the marker.  

...... and as they say "That's all folks" hope you enjoyed your read and don't forget the VSN challenge "Here Comes the Sun" over on SCS on the 18th and 19th March, link below.

Here Comes the Sun

For further information or to see other cards I have made why not pop over to my gallery at Split Coast Stampers
margscardcrazy 
0 Comments

    Author

    Hi I'm Marg living in Brisbane Queensland Australia, see About me page for more information

    Archives

    June 2020
    March 2020
    February 2020
    August 2019
    March 2019
    September 2018
    August 2018
    June 2018
    May 2018
    April 2018
    January 2018
    May 2017
    March 2017
    February 2017
    January 2017
    September 2016
    August 2016
    July 2016
    March 2016
    February 2016
    June 2015
    May 2015
    February 2015
    June 2014
    March 2014
    February 2014
    October 2013
    September 2012
    August 2012
    July 2012
    April 2012
    February 2012
    January 2012
    June 2011
    May 2011
    April 2011
    February 2011
    January 2011
    December 2010
    November 2010
    October 2010
    September 2010
    August 2010
    July 2010
    May 2010

    Categories

    All
    Anniversary
    Birthday
    Christmas
    Copic
    Copic Oz Challenge
    Copic OZ Challenge.
    Copic OZ Challenge\\
    Digi Art
    Easter
    Embossing Folders
    Fathers Day
    Flowersoft
    General
    Get Well
    Halloween
    Heat Embossing
    Magnolia
    Male
    Marbling
    Mothers Day
    Penny Black
    Pirates
    Salt Resist
    Salt Technique
    Scs Challenge
    Special
    Spellbinders
    Stampin Up
    Thank You
    Tim Holtz Inspired
    Unity Stamps
    Valentine
    Vsn


    Picture

    Picture

    Picture

    Picture

    Picture

    Picture

    Picture

    Picture

    Picture

    Picture

    Picture

    Picture

    Picture

    RSS Feed

Powered by Create your own unique website with customizable templates.