Good morning everyone, this card is for the CAS Colours & Sketches challenge found here;
http://cascoloursandsketches.blogspot.com.au/search/label/Challenges .... and also for the Technique Lovers Challenge on Split Coast Stampers found here;
http://www.splitcoaststampers.com/forums/try-new-technique-f44/tlc627-~-seashells-sea-shore-~-%7B02-27-2017%7D-t616434.html
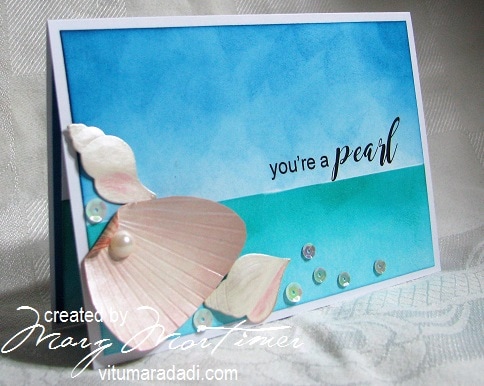
I was going to have a lot more bling and embellishments then realised that was not going to make it a CAS card so stopped at a few sequins
http://cascoloursandsketches.blogspot.com.au/search/label/Challenges .... and also for the Technique Lovers Challenge on Split Coast Stampers found here;
http://www.splitcoaststampers.com/forums/try-new-technique-f44/tlc627-~-seashells-sea-shore-~-%7B02-27-2017%7D-t616434.html
I was going to have a lot more bling and embellishments then realised that was not going to make it a CAS card so stopped at a few sequins
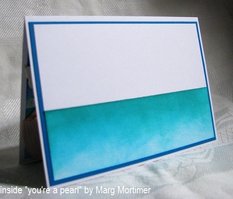
I have finished the card in my favourite way, by butting some X-Press It blending card stock which I have sponged with the colours used in the front of the card to depict the sea, against some plain X-Press It blending card stock and then mounting that on a piece of SU Pacific Point.
I really like finishing the inside of my cards like this, particularly if I have a lot on the front of the card as this gives the card stability.
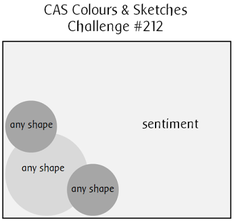
This is the sketch for the CC&S challenge. As you can see it is quite simple but often when a sketch is this simple it is hard to comply or at least it is for me lol.
I have used the shells as my three elements. In hind sight I would have preferred the main shell to be a little smaller but I didn't realise this until I had put the card together ...so there it is.
I've added the sequins just to lift it a bit. Not really happy with this one but I do like how the sky and sea came together.
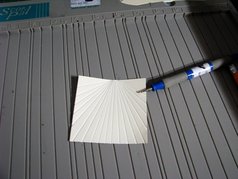
This photo shows how the scallop shell was made. It was more difficult than I first thought and this is the second example.
My first attempt I had the lines too close together so that when you cut out the shell shape it looked too busy and not like a scallop shell at all.

Once the shell shape was cut out I sponged both sides, first with SU Crumb Cake all over lightly then around the edges with SU Blushing Bride. This brought out the embossed lines and made it look like a shell.
Because I was intending to use the under side of the shell I painted it with some Jo Sonja's Pearl White that I had mixed with some Clear Glazed Medium to thin it.
This gave the inside of the shell a mother of pearl look.
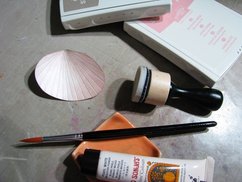
I also cut two other smaller shells from the Impressions Obsessions die set DIE077-W (shells 7 of them) sponged the same colours on them, dry embossed them a little to give them some dimension and painted them with the white pearl.
While the shells were drying I built the greeting. This has become one of my favourite things at the moment.
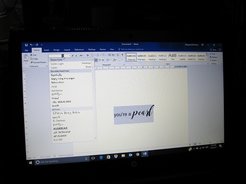
I love using different fonts in a greeting and have sourced some free ones that I have links to in different posts.
For this greeting I have used Arial @ 22 font size and Magnolia Sky @ 33 font size.
I printed it off on some ordinary A4 printing paper first just to check the size then printed it again on some X-Press It blending paper, in the middle of the paper to give me plenty of room to play as this was going to be the front panel of the card.
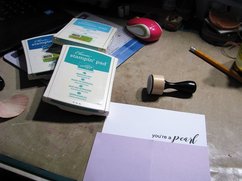
Once I had the greeting in situ I cut the panel to fit the base card.
The base card is always approximately 1/2 cm smaller than the envelope I am going to use all the way around, in this case the card base measures 15 cm x 11 cm.
I left 1/2 cm of border around the top panel of the card.
As you can see I masked the top panel about 2/3 down so that there was slightly more sky than sea. I sponged from the top edge down, blending out towards the masked area, I didn't worry about getting the blending smooth as I wanted to have the feeling of cloud and movement. This was done with SU Pacific Point and a mini circular blending sponge.
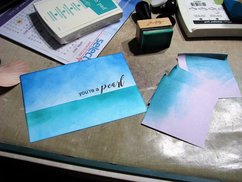
The sea was done in the same way by first using SU Tempting Turquoise starting at the masked end of the card and working out to the edge then going over this with SU Bermuda Bay working from the masked end and blending out about 1/2 way down.
These colours work really well as sea and I really like the way the sponging has turned out. I didn't over work it and was happy with any little anomalies lol.
Once all this was done it was time to put it all together using X-Press it High Tack double sided tape (love, love, love this stuff)
I attached the smaller shells with a small strip of high tack red line wonder tape and a SU Dimensional in the centre to lift them a bit and just attached the large focal shell with a strip of the wonder tape down the centre so the edges could turn up. Before I did this I rolled the top of the shell to give it a more natural look and added the pearl to the centre, finally I added some sequins from the SU Watercolour Card Kit (just love the colour of these sequins and they were perfect for this project)...and there you have it.
Thanks for popping by, I would love you to check out my gallery over on Split Coast Stampers found here;
http://www.splitcoaststampers.com/gallery/showgallery.php?cat=500&ppuser=198941
Cheers
Marg


 RSS Feed
