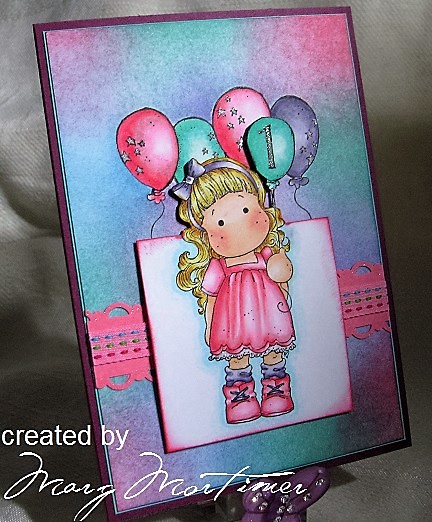
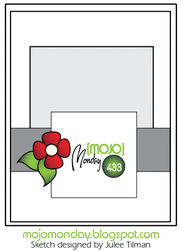
 |  This card is for both the Mojo Monday Card Challenge 433 found HERE and also Kathy Racoosin's 30-day Colour Challenge found HERE I came across the second challenge via a post I subscribe to of Jennifer McGuire's and thought it was a good idea as I love colouring. The card is for my granddaughter who turns one year old in July, her mum is really into rainbow colours hence all the different colours. I have used the background balloons as the second square for the sketch design but apart from that have stayed true to the design. |
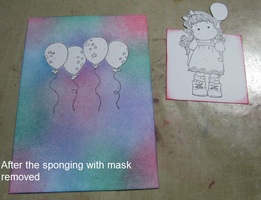
I started this card by stamping the background balloons, a Magnolia stamp and then masking them, unfortunately I couldn't find my masking film and so used Jack paper, this was a mistake it masked well but getting the paper off afterwards was very difficult.
With the balloons masked I sponged four separate Stampin Up (SU) colours randomly onto the background card stock using shaving brushes to do this which gave a nice soft and blended effect. I also sponged around the square main image with a sponge and sponge applicator. The main stamp is another Magnolia stamp "Tilda with Balloon"
With the balloons masked I sponged four separate Stampin Up (SU) colours randomly onto the background card stock using shaving brushes to do this which gave a nice soft and blended effect. I also sponged around the square main image with a sponge and sponge applicator. The main stamp is another Magnolia stamp "Tilda with Balloon"
 | 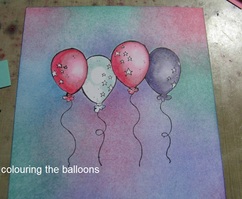 |
Once I had done the sponging it was time to start the colouring. I used my Copic markers for this. I don't think I will ever get tired of watching the colour glide onto the paper and move around.
Right or wrong I always start with my lightest colour carefully leaving the area that I want to highlight clear of any colour and blocking the rest in, next I take my darkest colour and add the shading then blend this out with the next lightest colour, quite often I will only use three colours but just as often I will use four colours and have been known to use as many as five colours depending on the shading effects I'm trying to achieve. The last step in my shading is to very lightly go over the area I have left clear of any colour with the lightest colour marker. In this case I also left the little stars clear and went over them with silver "Wink of Stella" once all the shading had been done.
Next it was time to colour the Tilda image including shading around the image to give it depth and then to make the band, part of the sketch layout.
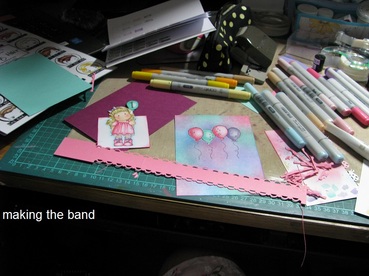
At this point the process became basic assembly of all the different elements. I put the band (made from SU Regal Rose card and the SU Scallop Trim Border punch, attaching some Shmick 2M Ribbon purchased from one of the $2 stores down the middle of this) onto the balloon background.
I then layered this to a piece of SU Coastal Cabana card leaving a very thin border, I then attached this to the base of the card which is SU Rich Razzleberry.
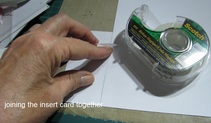
Before attaching the main "Tilda" image I made the insert for the inside of the card. This was done by cutting another piece of SU Coastal Cabana card to fit inside the card, I then cut a strip of X-Press It blending card (the same paper used for the stamped images) and sponged this with the same colours for the front of the card background. I attached some plain white blending card to the sponged strip (see photo below) by using "Scotch Magic Tape" to keep the join together while attaching the double sided tape and then attached this to the SU Coastal Cabana card with double sided tape which was attached to the inside of the base card.
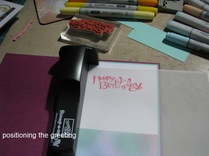
I always, always position my greetings and use my SU Stamp-a-ma-jig to do this. It would be unthinkable to get this far and ruin the card with a crooked greeting.
I then layered this to a piece of SU Coastal Cabana card leaving a very thin border, I then attached this to the base of the card which is SU Rich Razzleberry.
Before attaching the main "Tilda" image I made the insert for the inside of the card. This was done by cutting another piece of SU Coastal Cabana card to fit inside the card, I then cut a strip of X-Press It blending card (the same paper used for the stamped images) and sponged this with the same colours for the front of the card background. I attached some plain white blending card to the sponged strip (see photo below) by using "Scotch Magic Tape" to keep the join together while attaching the double sided tape and then attached this to the SU Coastal Cabana card with double sided tape which was attached to the inside of the base card.
I always, always position my greetings and use my SU Stamp-a-ma-jig to do this. It would be unthinkable to get this far and ruin the card with a crooked greeting.
 |  |
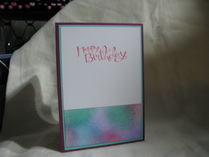
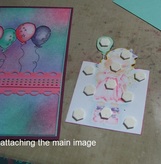
Finally I attached the main image to the front of the card. I always make sure I have ample double sided tape on my layers and if I'm using foam mounting (in this case SU Dimensionals) I make sure I use enough to give a secure attachment.
 |  |  |
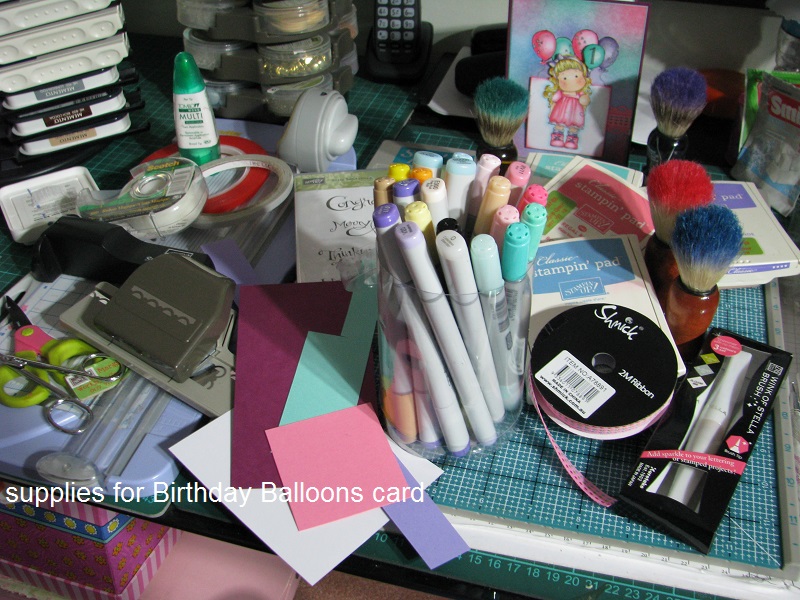
Ink;
Memento Tuxedo Black (for images), SU Regal Rose, Coastal Cabana, Lavender Lace and Marina Mist (for the sponged backgrounds)
Stamps;
Magnolia Balloon Background, Tilda with Balloon, SU Sassy Salutations (for the inside greeting)
Card;
X-Press It Blending Card, SU Rich Razzleberry, Coastal Cabana and Regal Rose.
Accessories;
Copic markers;
Face / skin = E000, E00 & R20
Hair = Y11, Y15, Y38, E31
Dress / shoes = RV10, RV11, RV14
Socks / hairband = V20, V25, V17
Balloons = RV10, RV11, RV14, BG10,BG34, BG23, V20, V25, V17
Shading around image = B0000, B000, B00 + 0 clear
Outlines = 100 black and multi liner 0.1
Clear Wink of Stella along the edge of the banner and petticoat, silver Wink of Stella on the balloon stars and the number one.
Shaving brushes for blending inks, Tim Holtz sponge applicator and sponge
Stamp-a-ma-jig + vellum
Procraft Teflon coated scissors
Nail scissors (fro fussy cutting)
SU Dimensionals foam mounts
Double sided tape, Craft 4 U Super adhesive double sided tape, Tombo multi liquid glue
SU border punch Scallop Trim
For further information or to see other cards I have made why not pop over to my gallery at Split Coast Stampers
margscardcrazy
Hope this has helped to inspire you and you will have a go at the many challenges available
Cheers
Marg


 RSS Feed
