 |  |  |
Sunday, yesterday saw me playing just for the sake of playing for the very first time and I loved it. We have decided that Fridays were going to be sloth day where ever possible and I have decided that Sunday is going to be creative play day where ever possible.
A few days ago I was watching a Jennifer McGuire tutorial on monochromatic ink layering. Jennifer used shadow inks and Versa Mark watermark and did say that the technique didn't work with some inks.
I have 109 Stampin Up (SU) ink pads 15 Ranger / Tim Holtz Distress ink pads and a dozen or more Brilliance ink pads along with Kaleidacolor pads and an assortment of Adirondack and other brands, so have no intention of purchasing any other brands.
I wanted to see if I could get the same effect with the ink pads I already had.
Unfortunately the watermark ink doesn't react with either the SU ink or the Distress inks so I substituted the watermark ink for bleach and it worked perfectly.
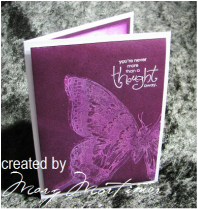
The first (purple) card is exactly the same as the cards done by Jennifer apart from using bleach instead of the watermark ink. The ink used was SU Blackberry Bliss, the logic behind this choice was to use one of the retired in-color pads because this technique does use quite a lot of ink and those colors are expendable, sort of.
I used SU Whisper White craft ink to over stamp the butterfly slightly off setting it and for the greeting I used Versa Mark watermark ink and white super fine embossing powder from Ranger
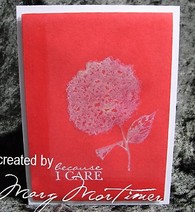
The second card is a series of stuff ups that in the end came out OK.
First of all the card had a slightly ragged edge to two sides so I lightly sanded these edge not thinking about what would happen when I inked the card, what happened was the card where I sanded had it's surface compromised which meant it took up more ink than the surface that hadn't been sanded giving a border down the side and across the bottom however this was uniform so I decided to leave it.
The next stuff up was that I had stamped the image onto some vellum with Memento Tuxedo Black so that I could use my stamp position tool. I thought I had cleaned the stamp but when I inked the stamp up with the Versa Mark to see if I could get a reaction this time using Barn Door Distress ink a shadow was left but no reaction, when I over stamped again this time with the bleach it gave a slightly grey shadow and added dimension so that was a happy mistake. I finished this card off the same as the purple one.
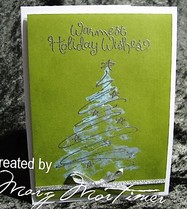
With the green Christmas card I accepted I wasn't going to get a reaction with the Versa Mark so went straight to using the bleach after having inked up the card with Peeled Paint distress ink. I had to over stamp three times to get a worthwhile image and the bleach reacted completely differently on the green ink but I'm happy with the result. I also used silver embossing powder to do the over stamping and greeting.
A few days ago I was watching a Jennifer McGuire tutorial on monochromatic ink layering. Jennifer used shadow inks and Versa Mark watermark and did say that the technique didn't work with some inks.
I have 109 Stampin Up (SU) ink pads 15 Ranger / Tim Holtz Distress ink pads and a dozen or more Brilliance ink pads along with Kaleidacolor pads and an assortment of Adirondack and other brands, so have no intention of purchasing any other brands.
I wanted to see if I could get the same effect with the ink pads I already had.
Unfortunately the watermark ink doesn't react with either the SU ink or the Distress inks so I substituted the watermark ink for bleach and it worked perfectly.
The first (purple) card is exactly the same as the cards done by Jennifer apart from using bleach instead of the watermark ink. The ink used was SU Blackberry Bliss, the logic behind this choice was to use one of the retired in-color pads because this technique does use quite a lot of ink and those colors are expendable, sort of.
I used SU Whisper White craft ink to over stamp the butterfly slightly off setting it and for the greeting I used Versa Mark watermark ink and white super fine embossing powder from Ranger
The second card is a series of stuff ups that in the end came out OK.
First of all the card had a slightly ragged edge to two sides so I lightly sanded these edge not thinking about what would happen when I inked the card, what happened was the card where I sanded had it's surface compromised which meant it took up more ink than the surface that hadn't been sanded giving a border down the side and across the bottom however this was uniform so I decided to leave it.
The next stuff up was that I had stamped the image onto some vellum with Memento Tuxedo Black so that I could use my stamp position tool. I thought I had cleaned the stamp but when I inked the stamp up with the Versa Mark to see if I could get a reaction this time using Barn Door Distress ink a shadow was left but no reaction, when I over stamped again this time with the bleach it gave a slightly grey shadow and added dimension so that was a happy mistake. I finished this card off the same as the purple one.
With the green Christmas card I accepted I wasn't going to get a reaction with the Versa Mark so went straight to using the bleach after having inked up the card with Peeled Paint distress ink. I had to over stamp three times to get a worthwhile image and the bleach reacted completely differently on the green ink but I'm happy with the result. I also used silver embossing powder to do the over stamping and greeting.
Each card was quite economical to make apart from the amount of ink used. Each card was made from a single sheet of A4 X-Press It blending paper.
The base was cut 20 cm x 14 cm scoring and folding at the 10 cm point of the 20 cm length.
The off cuts from the card were then used for the front panel and the centre internal sponged panel.
The front panel was also mounted on some craft foam, this is a favorite of Jennifer's as well and was the first time I have tried it.
I will be doing this again, it gives a very firm mounting for panels with just enough raise to make it interesting.
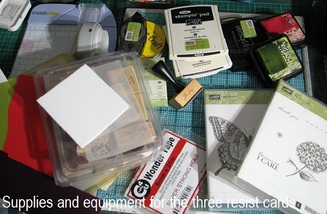
The supplies used are in the photo opposite with the exception of the embossing powders which were SU Silver and Ranger Super fine white.
All stamps used are SU sets, Because I care, Swallowtail, Whimsical Words, Solemn Stillness & Holiday Wishes.
A WORD OF CAUTION
When using bleach only use rubber stamps and clean them immediately after use. I clean the stamp with clean water then with my stamp cleaner and give them a good scrub then with water again and then dry them thoroughly.
Hope you find some time to have a play and get creative.
Below are some links you may find interesting;
Jennifer McGuire
Kristina Werner
margscardcrazy SCS gallery
Cheers
Marg


 RSS Feed
